The installation pipeline is where evSuryam stops being a quoting tool and becomes your operations command centre. Every rooftop solar job you win lands on a Kanban board, moves left-to-right through five stages, and carries its crew assignments, site photos, and documents the whole way. Your office sees exactly where each project sits without a single phone call to site.
Overview
Open Pipeline in the left sidebar. You'll see a board with one column per stage and a card for every active installation. Each card shows the customer name, system size in kW, the assigned crew, and a small badge for the number of photos logged. Drag a card right as work progresses; the whole team — office, sales, and the installer on the roof — sees the same live picture.
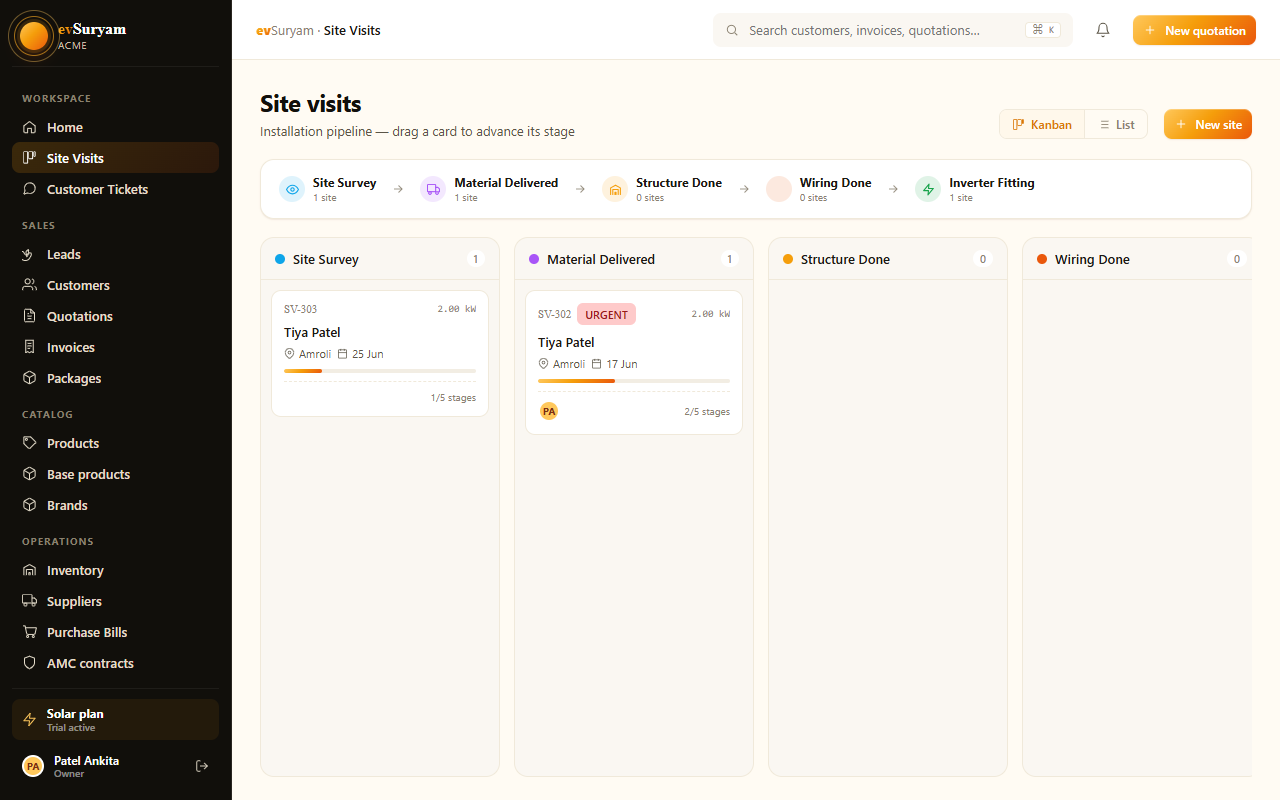
public/images/docs/installation-pipeline.pngOne board, one truthThe pipeline replaces the WhatsApp groups and paper job-cards most vendors juggle. When a card moves to Commissioning, accounts knows it's time to raise the final invoice and sales knows the customer is ready for a subsidy update — no status meeting required.
From Won quote to project
You never create a pipeline project by hand. It's born automatically the moment a quotation is accepted.
- In Quotations, open the quote the customer has approved.
- Click Mark as Won. evSuryam confirms the system size, panel and inverter selection, and the agreed price.
- A new project card appears in the Site Survey column of the pipeline, pre-filled with the customer, address, system size, and the bill of materials from the quote.
- The catalog items on the quote (panels, inverter, mounting, BOS) become the project's planned material list — used later to reserve and consume stock.
Because the project inherits everything from the quote, there's no re-keying of the customer's address, load, or kW. Get the quotation right once and the project starts clean.
The quote stays linkedOpen any project card and you can jump back to the originating quote and the customer record. This link is what lets the customer portal show the homeowner their own job moving through the stages — see the customer portal.
The five Kanban stages
Every rooftop installation in India follows roughly the same arc. evSuryam models it as five stages — enough to track real progress, few enough that crews actually keep cards moving.
- Site Survey — A team visits the roof to measure available area, check shadow-free zones, assess the structure, photograph the existing meter and sanctioned load, and confirm the design assumptions in the quote still hold.
- Design & Engineering — Engineers produce the final panel layout, string design, single-line diagram (SLD), and structure drawings. Net-metering paperwork for the DISCOM is prepared here.
- Civil Work — The mounting structure goes up: foundations or ballast, rails, and clamps. This is the stage that physically anchors the array to the roof.
- Electrical Work — Panels are mounted, strings are wired, the inverter and ACDB/DCDB are installed, earthing and lightning arrestor are fitted, and the AC side is connected up to the changeover.
- Commissioning / net-metering — The system is energised and tested, the DISCOM inspection happens, the bi-directional (net) meter is installed, and the plant is handed over to the customer.
Stage-by-stage exit criteria
A card should only move right when the stage is genuinely complete. Use the exit criteria below as the definition of done — they keep half-finished jobs from looking finished on the board.
| Stage | What happens | Exit criteria — done when… |
|---|---|---|
| Site Survey | Measure roof area & tilt, mark shade-free zones, record sanctioned load & meter number, photograph existing roof condition. | Survey photos uploaded, usable area & orientation confirmed, any deviation from the quote flagged to sales. |
| Design & Engineering | Final array layout, string sizing, SLD, structure drawing; DISCOM net-metering application prepared. | Approved layout & SLD attached to the card, material list finalised, net-metering application submitted. |
| Civil Work | Foundations / ballast cast, rails and mounting structure erected, structure earthing laid. | Min. 3 photos of mounting bolts & structure logged, structure verified plumb and torqued. |
| Electrical Work | Panels mounted, DC strings & MC4 terminations made, inverter + DCDB/ACDB fitted, earthing & LA done, AC connected to changeover. | Min. 3 photos of wire dressing & terminations logged, polarity & insulation checks passed, system ready to energise. |
| Commissioning / net-metering | System energised, generation verified, DISCOM inspection, bi-directional meter installed, handover. | Net meter installed & sealed, commissioning report signed, final invoice raised, customer handover complete. |
Moving a project through
Driving a job from survey to commissioning is a matter of dragging cards and keeping each stage honest.
- Open the Pipeline board. Find the project's card in its current column.
- Do the work for that stage on site, then upload the stage's photos from the card (or from mobile — see photo logs).
- Check the stage against its exit criteria. If anything is incomplete, leave the card where it is.
- Drag the card to the next column. evSuryam timestamps the move, so you build an automatic history of how long each stage took.
- If a job stalls — a roof problem, a delayed DISCOM approval — leave it in place and add a note on the card. The board now shows your bottleneck at a glance.
Don't skip Site SurveyMarking a project Won and dragging it straight to Civil Work to "save time" is how vendors end up with a structure that doesn't fit the shadow-free area. The survey stage exists to catch the gap between what was quoted and what the roof actually allows — honour it.
Assigning crews
A project on the board means little until someone is responsible for it. Assign the crew so everyone knows whose job it is.
- Open the project card and click Assign crew.
- Pick the installers handling this site. They'll see the project in their own list and can upload photos for it.
- Optionally set a target date per stage so the office can spot slipping jobs early.
- The assigned crew receives the project in their app; the office tracks all crews from the one board.
Who can assign crews, move cards, or see project costs is governed by roles. A Sales Rep might watch the board read-only while only an Installer or Admin moves cards — configure this under team & roles, with a worked example in the custom roles example.
Photo logs & remote QC
Each project card has a photo log grouped by stage. This is the backbone of remote quality control: your senior engineer in the office approves work from photographs instead of driving to every rooftop.
- Installers upload photos straight from their phone, tagged to the current stage.
- For Civil Work, capture at least 3 photos showing the mounting bolts and structure anchoring.
- For Electrical Work, capture at least 3 photos showing wire dressing, MC4 terminations, and earthing — taken before panels hide the cabling.
- Your office reviews the gallery and approves the stage, or sends it back with a comment if something looks wrong.
Getting consistent, useful photos out of a busy crew is its own skill. The full field guide — what to shoot, when, and why — is in photo logging best practices.
Photos do double dutyThe same images that let you approve work remotely also appear in the customer's portal, so the homeowner watches their rooftop take shape. Good photo discipline is both your QC trail and your customer-experience win.
Commissioning & net-metering hand-off
The final stage is where a built plant becomes a live, billable solar connection. In India this means coordinating with the DISCOM for inspection and the bi-directional (net) meter.
- Energise & test — Power up the inverter, confirm generation, and run your commissioning checks. Log the commissioning photos and the inverter's first-generation reading.
- DISCOM inspection — The distribution company inspects the installation against the approved SLD and net-metering application prepared back in the Design stage.
- Net meter installation — Once cleared, the DISCOM installs and seals the bi-directional meter that nets your customer's export against their import.
- Handover & final invoice — Hand the system over to the customer with the commissioning report, and raise the final invoice. The card moves to done.
For systems claiming central subsidy, the commissioning paperwork and net-meter installation are also what unlock the subsidy disbursement — see the PM Surya Ghar subsidy guide for the National Portal steps that run in parallel with this stage.